Table of Contents
Here are some more layout managers that you can use.
Two recently introduced layout managers are BoxLayout and SpringLayout.
GridBagLayout, is often referred to as “the mother of all layout managers”. It is probably the most complex of all layout managers. It can do virtually any layout you would like, but not without putting up a good fight. It takes a long time to learn it, and once you’ve learnt it, you’ll still forget how to use it the next time you need it.
SpringLayout, in particular, is an attempt to create a more flexible layout manager without the difficulties created by trying to use GridBagLayout.
BoxLayout
BoxLayout is a layout manager provided by Swing (unlike the other layout managers, it is located in the javax.swing package).
BoxLayout arranges a sequence of components horizontally or vertically.
For vertical layouts, here is what the BoxLayout manager does:
- It computes the maximum width of the widest component.
- It tries to grow all components horizontally to that width.
- If a component does not actually grow to that width when requested, its x-alignment is queried by calling its
getAlignmentX()method. This method returns a floating-point number between 0.0 (align left) and 1.0 (align right). The default in the Component class is 0.5 (center). The value is used to align the component horizontally. - The preferred height of each component is obtained. All preferred heights are added up.
- If the total preferred height is less than the box height, then the components are expanded, by letting them grow to their maximum height. Components are then placed, from top to bottom, with no additional space between them.
If the total preferred height is greater than the box height, the components are shrunk, potentially down to their minimum height, but no further.
If the components don’t all fit at their minimum height, some of them will not be shown.
For horizontal layouts, the process is analogous.
Example 1
Here’s an example of the use of BoxLayout:
package swingExamples;

import java.awt.Container;

import javax.swing.BoxLayout;
import javax.swing.JButton;
import javax.swing.JFrame;
import javax.swing.JLabel;
import javax.swing.JPanel;
import javax.swing.JTextField;

class BoxLayoutExamplePanel extends JPanel
{
  public BoxLayoutExamplePanel()
  {
    setLayout( new BoxLayout(this, BoxLayout.Y_AXIS) );
    add(new JButton("Click me"));
    add(new JLabel("I am a label"));
    add(new JTextField("Text field"));
    add(new JButton("A very long button label is this..."));
  }
}

public class BoxLayoutExample1 extends JFrame
{
  public BoxLayoutExample1()
  {
    setDefaultCloseOperation(EXIT_ON_CLOSE);
    setTitle("BoxLayout");
    Container contentPane = getContentPane();
    contentPane.add( new BoxLayoutExamplePanel() );
  }

  public static void main(String[] args)
  {
    JFrame frame = new BoxLayoutExample1();
    frame.setSize(300, 200);
    frame.setVisible(true);
  }
}
which produces the following:
Example 2
You’ll note that the JTextField in the previous example expands unreasonably, filling the remaining space. One solution to this is to set the maximum size of the component, as follows:
package swingExamples;

import java.awt.Container;

import javax.swing.BoxLayout;
import javax.swing.JButton;
import javax.swing.JFrame;
import javax.swing.JLabel;
import javax.swing.JPanel;
import javax.swing.JTextField;

class BoxLayoutExamplePanel extends JPanel
{
  public BoxLayoutExamplePanel()
  {
    setLayout(new BoxLayout(this, BoxLayout.Y_AXIS));
    add(new JButton("Click me"));
    add(new JLabel("I am a label"));
    JTextField textField = new JTextField("Text field", 20);
    textField.setMaximumSize(textField.getPreferredSize());
    add(textField);
    add(new JButton("A very long button label is this..."));
  }
}

public class BoxLayoutExample2 extends JFrame
{
  public BoxLayoutExample2()
  {
    setDefaultCloseOperation(EXIT_ON_CLOSE);
    setTitle("BoxLayout");
    Container contentPane = getContentPane();
    contentPane.add(new BoxLayoutExamplePanel());
  }

  public static void main(String[] args)
  {
    JFrame frame = new BoxLayoutExample2();
    frame.setSize(300, 200);
    frame.setVisible(true);
  }
}
which produces:

Example 3
Even now, the results doesn’t look like much. Everything is kind of scrunched together.
We can improve things by using struts, which can introduce vertical or horizontal space:
package swingExamples;

import java.awt.Container;

import javax.swing.Box;
import javax.swing.BoxLayout;
import javax.swing.JButton;
import javax.swing.JFrame;
import javax.swing.JLabel;
import javax.swing.JPanel;
import javax.swing.JTextField;

class BoxLayoutExamplePanel extends JPanel
{
  public BoxLayoutExamplePanel()
  {
    setLayout(new BoxLayout(this, BoxLayout.Y_AXIS));
    add(new JButton("Click me"));
    add( Box.createVerticalStrut(10) );
    add(new JLabel("I am a label"));
    add( Box.createVerticalStrut(5) );
    JTextField textField = new JTextField("Text field", 20);
    textField.setMaximumSize(textField.getPreferredSize());
    add(textField);
    add( Box.createVerticalStrut(40) );
    add(new JButton("A very long button label is this..."));
  }
}

public class BoxLayoutExample3 extends JFrame
{
  public BoxLayoutExample3()
  {
    setDefaultCloseOperation(EXIT_ON_CLOSE);
    setTitle("BoxLayout");
    Container contentPane = getContentPane();
    contentPane.add(new BoxLayoutExamplePanel());
  }

  public static void main(String[] args)
  {
    JFrame frame = new BoxLayoutExample3();
    frame.setSize(300, 200);
    frame.setVisible(true);
  }
}
which produces:
As you can see, the struts have introduced some vertical spacing between the components.
Example 4
Before we go any further, we need to introduce the concept of combining horizontal and vertical box layouts. This is further simplified by the use of the Box container.
Let’s modify our example so that we are actually producing more meaningful content, and use both horizontal and vertical boxes:
package swingExamples;

import java.awt.BorderLayout;
import java.awt.Container;
import javax.swing.Box;
import javax.swing.JButton;
import javax.swing.JFrame;
import javax.swing.JLabel;
import javax.swing.JPanel;
import javax.swing.JTextField;

class BoxLayoutExamplePanel extends JPanel
{
  public BoxLayoutExamplePanel()
  {
    setLayout( new BorderLayout() );

    // Create a horizontal box & populate it
    Box hbox1 = Box.createHorizontalBox();
    hbox1.add( new JLabel("Name:") );
    hbox1.add( Box.createHorizontalStrut(10) );
    JTextField nameTextField = new JTextField(10);
    nameTextField.setMaximumSize(
        nameTextField.getPreferredSize() );
    hbox1.add(nameTextField);

    // Create another horizontal box & populate it
    Box hbox2 = Box.createHorizontalBox();
    hbox2.add( new JLabel("Password:") );
    hbox2.add( Box.createHorizontalStrut(10) );
    JTextField passwordTextField = new JTextField(10);
    passwordTextField.setMaximumSize(
        passwordTextField.getPreferredSize() );
    hbox2.add(passwordTextField);

    // Create yet another horizontal box & populate it
    Box hbox3 = Box.createHorizontalBox();
    hbox3.add( new JButton("OK") );
    hbox3.add( Box.createHorizontalStrut(10) );
    hbox3.add( new JButton("Cancel") );

    // Now, create a vertical box, & add the
    // horizontal boxes to it.
    Box vbox = Box.createVerticalBox();
    vbox.add(hbox1);
    vbox.add(hbox2);
    vbox.add(hbox3);

    // Finally, add the vertical box to the center
    // of the panel's border layout.
    add(vbox, BorderLayout.CENTER);
  }
}

public class BoxLayoutExample4 extends JFrame
{
  public static void main(String[] args)
  {
    JFrame frame = new BoxLayoutExample4();
    frame.setSize(300, 200);
    frame.setVisible(true);
  }
  public BoxLayoutExample4()
  {
    setDefaultCloseOperation(EXIT_ON_CLOSE);
    setTitle("BoxLayout");
    Container contentPane = getContentPane();
    contentPane.add(new BoxLayoutExamplePanel());
  }
}
which produces:
This is starting to produce more pleasing results!
Example 5
We can change the layout further, by the use of rigid areas:
package swingExamples;

import java.awt.BorderLayout;
import java.awt.Container;
import java.awt.Dimension;
import javax.swing.Box;
import javax.swing.JButton;
import javax.swing.JFrame;
import javax.swing.JLabel;
import javax.swing.JPanel;
import javax.swing.JTextField;

class BoxLayoutExamplePanel extends JPanel
{
  public BoxLayoutExamplePanel()
  {
    setLayout( new BorderLayout() );

    // Create a horizontal box & populate it
    Box hbox1 = Box.createHorizontalBox();
    hbox1.add( new JLabel("Name:") );
    hbox1.add( Box.createHorizontalStrut(10) );
    JTextField nameTextField = new JTextField(10);
    nameTextField.setMaximumSize(
        nameTextField.getPreferredSize() );
    hbox1.add(nameTextField);

    // Create another horizontal box & populate it
    Box hbox2 = Box.createHorizontalBox();
    hbox2.add( new JLabel("Password:") );
    hbox2.add( Box.createHorizontalStrut(10) );
    JTextField passwordTextField = new JTextField(10);
    passwordTextField.setMaximumSize(
        passwordTextField.getPreferredSize() );
    hbox2.add(passwordTextField);

    // Create yet another horizontal box & populate it
    Box hbox3 = Box.createHorizontalBox();
    hbox3.add( new JButton("OK") );
    hbox3.add( Box.createHorizontalStrut(10) );
    hbox3.add( new JButton("Cancel") );

    // Now, create a vertical box, &
    // add the horizontal boxes to it.
    Box vbox = Box.createVerticalBox();
    vbox.add(hbox1);
    vbox.add(hbox2);
    vbox.add( Box.createRigidArea(
        new Dimension(10, 80) ) );
    vbox.add(hbox3);

    // Finally, add the vertical box to the
    // center of the panel's border layout.
    add(vbox, BorderLayout.CENTER);
  }
}

public class BoxLayoutExample5 extends JFrame
{
  public BoxLayoutExample5()
  {
    setDefaultCloseOperation(EXIT_ON_CLOSE);
    setTitle("BoxLayout");
    Container contentPane = getContentPane();
    contentPane.add( new BoxLayoutExamplePanel() );
  }

  public static void main(String[] args)
  {
    JFrame frame = new BoxLayoutExample5();
    frame.setSize(300, 200);
    frame.setVisible(true);
  }
}
which produces:
In other words, a rigid area is way of inserting both vertical and horizontal space.
Example 6
Let’s say that we want to move the OK and Cancel buttons to the right.
We can do this using glue:
package swingExamples;

import java.awt.BorderLayout;
import java.awt.Container;
import java.awt.Dimension;
import javax.swing.Box;
import javax.swing.JButton;
import javax.swing.JFrame;
import javax.swing.JLabel;
import javax.swing.JPanel;
import javax.swing.JTextField;

class BoxLayoutExamplePanel extends JPanel
{
  public BoxLayoutExamplePanel()
  {
    setLayout( new BorderLayout() );

    // Create a horizontal box & populate it
    Box hbox1 = Box.createHorizontalBox();
    hbox1.add( new JLabel("Name:") );
    hbox1.add( Box.createHorizontalStrut(10) );
    JTextField nameTextField = new JTextField(10);
    nameTextField.setMaximumSize(
        nameTextField.getPreferredSize() );
    hbox1.add(nameTextField);

    // Create another horizontal box & populate it
    Box hbox2 = Box.createHorizontalBox();
    hbox2.add( new JLabel("Password:") );
    hbox2.add( Box.createHorizontalStrut(10) );
    JTextField passwordTextField = new JTextField(10);
    passwordTextField.setMaximumSize(
        passwordTextField.getPreferredSize() );
    hbox2.add(passwordTextField);

    // Create yet another horizontal box & populate it
    Box hbox3 = Box.createHorizontalBox();
    hbox3.add( Box.createGlue() );
    hbox3.add( new JButton("OK") );
    hbox3.add( Box.createHorizontalStrut(10) );
    hbox3.add( new JButton("Cancel") );
    hbox3.add( Box.createHorizontalStrut(5) );

    // Now, create a vertical box, &
    // add the horizontal boxes to it.
    Box vbox = Box.createVerticalBox();
    vbox.add(hbox1);
    vbox.add(hbox2);
    vbox.add( Box.createRigidArea(
        new Dimension(10, 80) ) );
    vbox.add(hbox3);

    // Finally, add the vertical box to the
    // center of the panel's border layout.
    add(vbox, BorderLayout.CENTER);
  }
}

public class BoxLayoutExample6 extends JFrame
{
  public BoxLayoutExample6()
  {
    setDefaultCloseOperation(EXIT_ON_CLOSE);
    setTitle("BoxLayout");
    Container contentPane = getContentPane();
    contentPane.add( new BoxLayoutExamplePanel() );
  }

  public static void main(String[] args)
  {
    JFrame frame = new BoxLayoutExample6();
    frame.setSize(300, 200);
    frame.setVisible(true);
  }
}
which produces:
The “glue”, placed between two components, has the effect of pushing components apart.
Note that I added a horizontal strut after the Cancel button to prevent it from being pushed all the way to the border of the panel.
GridBagLayout
GridBagLayout is by far the most difficult to use of the standard layout managers. While it is very flexible, it is incredibly painful to use, and very picky — the smallest mistake can mess things up royally!.
In order to use a GridBagLayout, you also must use a GridBagConstraints.
Here’s an example of the use of GridBagLayout:
package swingExamples;

import java.awt.Color;
import java.awt.Component;
import java.awt.Container;
import java.awt.Font;
import java.awt.GridBagConstraints;
import java.awt.GridBagLayout;

import java.awt.event.ActionEvent;
import java.awt.event.ActionListener;

import javax.swing.JCheckBox;
import javax.swing.JFrame;
import javax.swing.JLabel;
import javax.swing.JList;
import javax.swing.JPanel;
import javax.swing.JTextField;

import javax.swing.event.ListSelectionEvent;
import javax.swing.event.ListSelectionListener;

class FontLayoutPanel extends JPanel
    implements ActionListener, ListSelectionListener
{
  public FontLayoutPanel()
  {
    setLayout(new GridBagLayout());
    setBackground(Color.pink);
    GridBagConstraints gbc = new GridBagConstraints();

    m_fontList.setSelectedIndex(0);
    m_fontList.addListSelectionListener(this);
    gbc.fill = GridBagConstraints.BOTH;
    gbc.weightx = 0.0;
    gbc.weighty = 1.0;
    add(m_fontList, gbc, 0, 0, 1, 3);

    m_bold.addActionListener(this);
    m_bold.setBackground(Color.green);
    gbc.weightx = 1.0;
    gbc.fill = GridBagConstraints.NONE;
    gbc.anchor = GridBagConstraints.CENTER;
    add(m_bold, gbc, 1, 0, 2, 1);

    m_italic.addActionListener(this);
    m_italic.setBackground(Color.cyan);
    add(m_italic, gbc, 1, 1, 2, 1);

    m_sizeLabel.setBackground(Color.yellow);
    add(m_sizeLabel, gbc, 1, 2, 1, 1);

    m_size.addActionListener(this);
    gbc.fill = GridBagConstraints.HORIZONTAL;
    add(m_size, gbc, 2, 2, 1, 1);

    m_sample.setBackground(Color.magenta);
    m_sample.setEditable(false);
    m_sample.setText("The quick brown fox");
    gbc.anchor = GridBagConstraints.SOUTH;
    gbc.weighty = 0.0;
    add(m_sample, gbc, 0, 3, 4, 1);
  }

  private void add(Component comp,
                   GridBagConstraints gbc,
                   int x, int y,
                   int width, int height)
  {
    gbc.gridx = x;
    gbc.gridy = y;
    gbc.gridwidth = width;
    gbc.gridheight = height;
    add(comp, gbc);
  }

  public void actionPerformed(ActionEvent evt)
  {
    updateFont();
  }

  public void valueChanged(ListSelectionEvent evt)
  {
    updateFont();
  }

  private void updateFont()
  {
    int style = 0;
    if (m_bold.isSelected())
    {
      style = Font.BOLD;
    }
    if (m_italic.isSelected())
    {
      style += Font.ITALIC;
    }
    Font font = new Font(
        (String) m_fontList.getSelectedValue(),
        style,
        Integer.parseInt(m_size.getText())
        );
    m_sample.setFont(font);
    repaint();
  }

  ////// Private data //////
  private static final String[] m_fonts =
  {
    "Serif", "SansSerif", "Monospaced",
    "Dialog", "DialogInput"
  };
  private JList m_fontList = new JList(m_fonts);
  private JCheckBox m_bold = new JCheckBox("Bold");
  private JCheckBox m_italic = new JCheckBox("Italic");
  private JLabel m_sizeLabel = new JLabel("Size: ");
  private JTextField m_size = new JTextField("10", 2);
  private JTextField m_sample = new JTextField();
}

class FontLayoutFrame extends JFrame
{
  public FontLayoutFrame()
  {
    setTitle("FontLayout");
    setSize(300, 200);
    setDefaultCloseOperation(EXIT_ON_CLOSE);
    Container contentPane = getContentPane();
    contentPane.add( new FontLayoutPanel() );
  }
}

public class GridBagLayoutExample
{
  public static void main(String[] args)
  {
    FontLayoutFrame frame = new FontLayoutFrame();
    frame.setVisible(true);
  }
}
which produces:
Note that the (rather garish!) colors are meant to show you the boundaries of the various components.
SpringLayout
SpringLayout is the latest attempt by JavaSoft to produce a layout manager that can compete with GridBagLayout for flexibility, but which is supposed to be easier and more intuitive to use.
Here’s an example, from the textbook (slightly modified by me):
package swingExamples;

/**
 * A class to show an example of a SpringLayout.
 *
 * @version 1.01 2004-05-06
 * @author Cay Horstmann, modified by Bryan Higgs
 */

import java.awt.Font;
import java.awt.event.ActionEvent;
import java.awt.event.ActionListener;
import javax.swing.BorderFactory;
import javax.swing.JCheckBox;
import javax.swing.JComboBox;
import javax.swing.JFrame;
import javax.swing.JLabel;
import javax.swing.JPanel;
import javax.swing.JTextArea;
import javax.swing.Spring;
import javax.swing.SpringLayout;

/**
 * A frame that uses a spring layout to arrange font
 * selection components.
 */
class FontDialogFrame extends JFrame
{
  public FontDialogFrame()
  {
    setTitle("FontDialog");
    setSize(DEFAULT_WIDTH, DEFAULT_HEIGHT);

    JPanel panel = new JPanel();
    SpringLayout layout = new SpringLayout();
    panel.setLayout(layout);

    ActionListener listener = new FontAction();

    // construct components
    JLabel faceLabel = new JLabel("Font Face: ");

    face = new JComboBox(
        new String[]
        {
          "Serif", "SansSerif", "Monospaced",
          "Dialog", "DialogInput"
        }
    );
    face.addActionListener(listener);

    JLabel sizeLabel = new JLabel("Size: ");

    size = new JComboBox(
        new String[]
        {
          "8", "10", "12", "15", "18",
          "24", "36", "48"
        }
    );

    size.addActionListener(listener);

    bold = new JCheckBox("Bold");
    bold.addActionListener(listener);

    italic = new JCheckBox("Italic");
    italic.addActionListener(listener);

    sample = new JTextArea();
    sample.setText(
        "The quick brown fox jumps over the lazy dog");
    sample.setEditable(false);
    sample.setLineWrap(true);
    sample.setBorder(
        BorderFactory.createEtchedBorder());

    panel.add(faceLabel);
    panel.add(sizeLabel);
    panel.add(face);
    panel.add(size);
    panel.add(bold);
    panel.add(italic);
    panel.add(sample);

    // add springs to lay out components
    Spring strut = Spring.constant(10);

    Spring labelsEast = Spring.sum(strut,
        Spring.max(
        layout.getConstraints(faceLabel).getWidth(),
        layout.getConstraints(sizeLabel).getWidth()));

    layout.putConstraint(
        SpringLayout.EAST,
        faceLabel, labelsEast, SpringLayout.WEST, panel);
    layout.putConstraint(
        SpringLayout.EAST,
        sizeLabel, labelsEast, SpringLayout.WEST, panel);

    layout.putConstraint(
        SpringLayout.NORTH,
        faceLabel, strut, SpringLayout.NORTH, panel);
    layout.putConstraint(
        SpringLayout.NORTH,
        face, strut, SpringLayout.NORTH, panel);

    Spring secondRowNorth =
        Spring.sum(strut,
                   Spring.max(
                      layout.getConstraint(
                          SpringLayout.SOUTH, faceLabel),
                      layout.getConstraint(
                          SpringLayout.SOUTH, face)
                      )
                   );

    layout.putConstraint(
        SpringLayout.NORTH,
        sizeLabel, secondRowNorth, SpringLayout.NORTH, panel);
    layout.putConstraint(
        SpringLayout.NORTH,
        size, secondRowNorth, SpringLayout.NORTH, panel);

    layout.putConstraint(
        SpringLayout.WEST,
        face, strut, SpringLayout.EAST, faceLabel);
    layout.putConstraint(
        SpringLayout.WEST,
        size, strut, SpringLayout.EAST, sizeLabel);

    layout.putConstraint(
        SpringLayout.WEST,
        bold, strut, SpringLayout.WEST, panel);
    layout.putConstraint(
        SpringLayout.WEST,
        italic, strut, SpringLayout.WEST, panel);

    Spring s = Spring.constant(10, 10000, 10000);

    Spring thirdRowNorth =
        Spring.sum(s,
                   Spring.max(
                      layout.getConstraint(
                        SpringLayout.SOUTH, sizeLabel),
                      layout.getConstraint(
                        SpringLayout.SOUTH, size)
                      )
                  );

    layout.putConstraint(
        SpringLayout.NORTH,
        bold, thirdRowNorth, SpringLayout.NORTH, panel);
    layout.putConstraint(
        SpringLayout.NORTH,
        italic, s, SpringLayout.SOUTH, bold);
    layout.putConstraint(
        SpringLayout.SOUTH,
        panel, s, SpringLayout.SOUTH, italic);

    Spring secondColumnWest =
        Spring.sum(strut,
                   Spring.max(
                      layout.getConstraint(
                        SpringLayout.EAST, face),
                      layout.getConstraint(
                        SpringLayout.EAST, size)
                      )
                   );

    layout.putConstraint(
        SpringLayout.WEST,
        sample, secondColumnWest, SpringLayout.WEST, panel);
    layout.putConstraint(
        SpringLayout.SOUTH,
        sample, Spring.minus(strut), SpringLayout.SOUTH, panel);
    layout.putConstraint(
        SpringLayout.NORTH,
        sample, strut, SpringLayout.NORTH, panel);
    layout.putConstraint(
        SpringLayout.EAST,
        panel, strut, SpringLayout.EAST, sample);

    add(panel);
  }

  ///// Private data ////
  private static final int DEFAULT_WIDTH = 400;
  private static final int DEFAULT_HEIGHT = 200;

  private JComboBox face;
  private JComboBox size;
  private JCheckBox bold;
  private JCheckBox italic;
  private JTextArea sample;

  /**
   * An action listener that changes the font of the
   * sample text.
   */
  private class FontAction implements ActionListener
  {
    public void actionPerformed(ActionEvent event)
    {
      String fontFace = (String) face.getSelectedItem();
      int fontStyle = (bold.isSelected() ? Font.BOLD : 0)
      + (italic.isSelected() ? Font.ITALIC : 0);
      int fontSize = Integer.parseInt(
                        (String) size.getSelectedItem());
      Font font = new Font(fontFace, fontStyle, fontSize);
      sample.setFont(font);
      sample.repaint();
    }
  }
}

public class SpringLayoutExample
{
  public static void main(String[] args)
  {
    FontDialogFrame frame = new FontDialogFrame();
    frame.setDefaultCloseOperation(JFrame.EXIT_ON_CLOSE);
    frame.setVisible(true);
  }
}
which produces the following output on my Microsoft Windows machine:
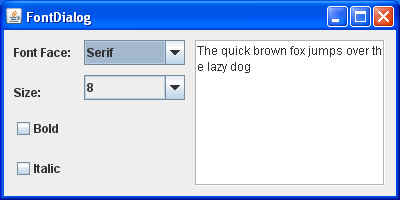
Well, it’s certainly not simple, is it?