Table of Contents
Before you can learn how to use the various GUI components provided by the Swing library, you need to learn how those GUI components are typically laid out within GUI containers.
Unlike with GUIs such as Microsoft Windows, which typically uses absolute pixel positioning to place its components, Java uses layout managers to control how things are laid out.
A major reason for using layout managers is that it can avoid the problems of the same code producing different results on different platforms.
You can use absolute pixel positioning for laying out components if you wish, but it is strongly discouraged.
FlowLayout
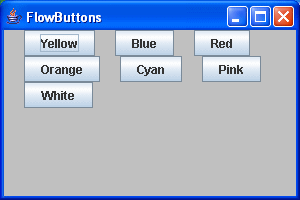
Consider what we did back in our discussion of events, when we created a number of JFrame with a number of JButtons.
Here’s an example:
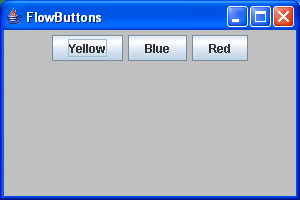
and here’s the program that produced the above frame:
package swingExamples;

import java.awt.Color;
import java.awt.Container;

import javax.swing.JButton;
import javax.swing.JFrame;
import javax.swing.JPanel;

class FlowButtons1Panel extends JPanel
{
  public FlowButtons1Panel()
  {
    setBackground(Color.lightGray);
    add(m_yellow);
    add(m_blue);
    add(m_red);
  }

  ////////////// Data //////////////////
  private JButton m_yellow = new JButton("Yellow");
  private JButton m_blue = new JButton("Blue");
  private JButton m_red = new JButton("Red");
}

class FlowButtons1Frame extends JFrame
{
  public FlowButtons1Frame()
  {
    setTitle("FlowButtons");
    setSize(300, 200);
    setDefaultCloseOperation(EXIT_ON_CLOSE);
    Container contentPane = getContentPane();
    contentPane.add( new FlowButtons1Panel() );
  }
}

public class FlowButtons1
{
  public static void main(String[] args)
  {
    FlowButtons1Frame frame = new FlowButtons1Frame();
    frame.setVisible(true);
  }
}
Notice that the buttons are nicely centered, horizontally.
Adding Buttons
Now, let’s see what happens is we add more buttons:
package swingExamples;

import java.awt.Color;
import java.awt.Container;

import javax.swing.JButton;
import javax.swing.JFrame;
import javax.swing.JPanel;

class FlowButtons2Panel extends JPanel
{
  public FlowButtons2Panel()
  {
    setBackground(Color.lightGray);
    add(m_yellow);
    add(m_blue);
    add(m_red);
    add(m_orange);
    add(m_cyan);
    add(m_pink);
    add(m_white);
  }

  ////////////// Data //////////////////
  private JButton m_yellow = new JButton("Yellow");
  private JButton m_blue = new JButton("Blue");
  private JButton m_red = new JButton("Red");
  private JButton m_orange = new JButton("Orange");
  private JButton m_cyan = new JButton("Cyan");
  private JButton m_pink = new JButton("Pink");
  private JButton m_white = new JButton("White");
}

class FlowButtons2Frame extends JFrame
{
  public FlowButtons2Frame()
  {
    setTitle("FlowButtons");
    setSize(300, 200);
    setDefaultCloseOperation(EXIT_ON_CLOSE);
    Container contentPane = getContentPane();
    contentPane.add( new FlowButtons2Panel() );
  }
}

public class FlowButtons2
{
  public static void main(String[] args)
  {
    FlowButtons2Frame frame = new FlowButtons2Frame();
    frame.setVisible(true);
  }
}
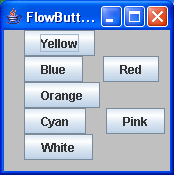
Here’s what we get:
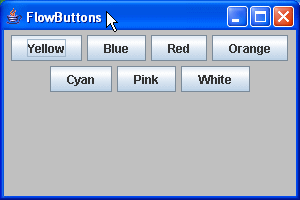
Again, notice that the buttons are still nicely centered, horizontally, and when there’s no more room left on the first row, the additional buttons are automatically placed in a second row.
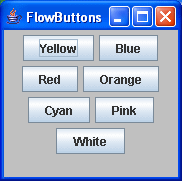
Furthermore, if the user resizes the frame, the buttons stay centered:
Layout Managers
What’s happening here?
We’re using something called a layout manager. In this case, we’re using a particular layout manager — FlowLayout. But how did we end up using it?
It turns out that FlowLayout is the default layout manager for a JPanel, so we get it for free in our examples above.
We can be explicit about using the FlowLayout manager. We can also change its default behavior. For example, we can specify that it left-align, instead of centering, and specify the gap between the components, in both the horizontal and vertical direction:
package swingExamples;

import java.awt.Color;
import java.awt.Container;
import java.awt.FlowLayout;

import javax.swing.JButton;
import javax.swing.JFrame;
import javax.swing.JPanel;

class FlowButtons3Panel extends JPanel
{
  public FlowButtons3Panel()
  {
    setBackground(Color.lightGray);
    setLayout(
        new FlowLayout(FlowLayout.LEFT, // Alignment
                       20, // Horizontal gap
                       0   // Vertical gap
                      )
             );
    add(m_yellow);
    add(m_blue);
    add(m_red);
    add(m_orange);
    add(m_cyan);
    add(m_pink);
    add(m_white);
  }

  ////////////// Data //////////////////
  private JButton m_yellow = new JButton("Yellow");
  private JButton m_blue = new JButton("Blue");
  private JButton m_red = new JButton("Red");
  private JButton m_orange = new JButton("Orange");
  private JButton m_cyan = new JButton("Cyan");
  private JButton m_pink = new JButton("Pink");
  private JButton m_white = new JButton("White");
}

class FlowButtons3Frame extends JFrame
{
  public FlowButtons3Frame()
  {
    setTitle("FlowButtons");
    setSize(300, 200);
    setDefaultCloseOperation(EXIT_ON_CLOSE);
    Container contentPane = getContentPane();
    contentPane.add( new FlowButtons3Panel() );
  }
}

public class FlowButtons3
{
  public static void main(String[] args)
  {
    FlowButtons3Frame frame = new FlowButtons3Frame();
    frame.setVisible(true);
  }
}
which produces the following results:
The LayoutManager Interface
A class that extends from java.awt.Container is responsible for laying out the components that are contained within it. Such classes delegate the responsibility of how components are laid out to a layout manager. A layout manager is responsible for:
- Calculating the preferred and minimum sizes for a container
- Laying out the components contained in a container.
A layout manager class implements the methods required by the LayoutManager interface:
| Method | Description |
|---|---|
public void addLayoutComponent(String name, Component comp) | Adds the specified component with the specified name to the layout. |
public void removeLayoutComponent(Component comp) | Removes the specified component from the layout. |
public Dimension preferredLayoutSize(Container parent) | Calculates the preferred size dimensions for the specified panel given the components in the specified parent container. |
public Dimension minimumLayoutSize(Container parent) | Calculates the minimum size dimensions for the specified panel given the components in the specified parent container. |
public void layoutContainer(Container parent) | Lays out the container in the specified panel. |
FlowLayout and GridLayout (to be described later) implement the LayoutManager interface directly.
The LayoutManager2 Interface
Some layout managers attach constraints to components that determine how the components are to be laid out. As we’ll see soon, BorderLayout is an example of such a layout manager.
The LayoutManager2 interface is for such constraint-applying layout managers; it extends from the LayoutManager interface, and adds the following methods:
| Method | Description |
|---|---|
public void addLayoutComponent(Component comp, Object constraints) | Adds the specified component to the layout, using the specified constraint object. |
public Dimension maximumLayoutSize(Container target) | Returns the maximum size of this component. |
public float getLayoutAlignmentX(Container target) | Returns the alignment along the x axis. This specifies how the component would like to be aligned relative to other components. The value should be a number between 0 and 1 where 0 represents alignment along the origin, 1 is aligned the furthest away from the origin, 0.5 is centered, etc. |
public float getLayoutAlignmentY(Container target) | Returns the alignment along the y axis. This specifies how the component would like to be aligned relative to other components. The value should be a number between 0 and 1 where 0 represents alignment along the origin, 1 is aligned the furthest away from the origin, 0.5 is centered, etc. |
public void invalidateLayout(Container target) | Invalidates the layout, indicating that if the layout manager has cached information it should be discarded. |
The BorderLayout, BoxLayout, CardLayout, and GridBagLayout layout managers all implement the LayoutManager2 interface.
Components & Containers
The Component Class
Components implement two methods that affect their interactions with layout managers:
| Method | Description |
|---|---|
public Dimension getPreferredSize() | Gets the preferred size of this component. |
public Dimension getMinimumSize() | Gets the minimum size of this component. |
Each Component within a Container tells the Container‘s layout manager what size it would prefer to be, and what minimum size it needs to be. Typically, a layout manager will cycle through the Components within the Container to determine the preferred and minimum sizes for the container itself.
The Container Class
Containers implement a number of methods that affect their interactions with layout managers:
| Method | Description |
|---|---|
public Component add(Component comp) | Adds the specified component to the end of this container. |
public Component add(Component comp, int index) | Adds the specified component to this container at the given position. The index is the position at which to insert the component, or -1 to insert the component at the end. |
public void add(Component comp, Object constraints) | Adds the specified component to the end of this container. Also notifies the layout manager to add the component to this container’s layout using the specified constraints object. |
public void add(Component comp, Object constraints, int index) | Adds the specified component to this container with the specified constraints at the specified index. Also notifies the layout manager to add the component to the this container’s layout using the specified constraints object. |
protected void addImpl(Component comp, Object constraints, int index) | Adds the specified component to this container at the specified index. This method also notifies the layout manager to add the component to this container’s layout using the specified constraints object.This is the method to override if a program needs to track every add request to a container. An overriding method should usually include a call to the superclass’s version of the method:super.addImpl(comp, constraints, index) |
public Component getComponent(int n) | Gets the nth component in this container. |
public Component[] getComponents() | Gets all the components in this container. |
public int getComponentCount() | Gets the number of components in this panel. |
public Insets getInsets() | Determines the insets of this container, which indicate the size of the container’s border. A Frame object, for example, has a top inset that corresponds to the height of the frame’s title bar. |
public void remove(int index) | Removes the component, specified by index, from this container. |
public void remove(Component comp) | Removes the specified component from this container. |
public void removeAll() | Removes all the components from this container. |
public LayoutManager getLayout() | Gets the layout manager for this container. |
public void setLayout(LayoutManager mgr) | Sets the layout manager for this container. |
public void doLayout() | Causes this container to lay out its components. Most programs should not call this method directly, but should invoke the validate method instead. |
public void invalidate() | Invalidates the container. The container and all parents above it are marked as needing to be laid out. This method can be called often, so it needs to execute quickly. |
public void validate() | Validates this container and all of its subcomponents. AWT uses validate to cause a container to lay out its subcomponents again after the components it contains have been added to or modified. |
protected void validateTree() | Recursively descends the container tree and recomputes the layout for any subtrees marked as needing it (those marked as invalid). Synchronization should be provided by the method that calls this one: validate. |
BorderLayout
The BorderLayout layout manager is one of the most useful layout managers provided in the JDK. It lays out components according to the points of the compass: NORTH, SOUTH, EAST, WEST, and CENTER.
Here’s an example that shows its use:
package swingExamples;

import java.awt.BorderLayout;
import java.awt.Color;
import java.awt.Container;

import javax.swing.JButton;
import javax.swing.JFrame;
import javax.swing.JPanel;

class BorderButtons1Panel extends JPanel
{
  public BorderButtons1Panel()
  {
    setBackground(Color.lightGray);
    setLayout( new BorderLayout() );
    add(m_north,  BorderLayout.NORTH);
    add(m_south,  BorderLayout.SOUTH);
    add(m_east,   BorderLayout.EAST);
    add(m_west,   BorderLayout.WEST);
    add(m_center, BorderLayout.CENTER);
  }

  ////////////// Data //////////////////
  private JButton m_north = new JButton("North");
  private JButton m_south = new JButton("South");
  private JButton m_east = new JButton("East");
  private JButton m_west = new JButton("West");
  private JButton m_center = new JButton("Center");
}

class BorderButtons1Frame extends JFrame
{
  public BorderButtons1Frame()
  {
    setTitle("BorderButtons");
    setSize(300, 200);
    setDefaultCloseOperation(EXIT_ON_CLOSE);
    Container contentPane = getContentPane();
    contentPane.add( new BorderButtons1Panel() );
  }
}

public class BorderButtons1
{
  public static void main(String[] args)
  {
    BorderButtons1Frame frame = new BorderButtons1Frame();
    frame.setVisible(true);
  }
}
which produces:
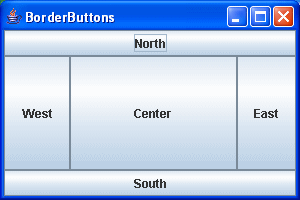
Note that the buttons’ preferred sizes appear to be completely ignored by the BorderLayout layout manager. Actually, what happens is that:
- The North and South regions pay attention to the component’s preferred height, and stretch out the component to fill the region horizontally
- The East and West regions pay attention to the component’s preferred width, and stretch out the component to fill the region vertically.
- The Center region gets what’s left over, regardless of the component’s preferred size, and the component gets stretched both horizontally and vertically.
GridLayout
Some would claim that GridLayout is perhaps the easiest layout manager to use.
For example:
package swingExamples;

import java.awt.Color;
import java.awt.Container;
import java.awt.GridLayout;

import javax.swing.JButton;
import javax.swing.JFrame;
import javax.swing.JPanel;

class GridButtons1Panel extends JPanel
{
  public GridButtons1Panel()
  {
    setBackground(Color.lightGray);
    setLayout( new GridLayout(1, 3) ); // rows, cols
    add(m_button1);
    add(m_button2);
    add(m_button3);
  }

  ////////////// Data //////////////////
  private JButton m_button1 = new JButton("1");
  private JButton m_button2 = new JButton("2");
  private JButton m_button3 = new JButton("3");
}

class GridButtons1Frame extends JFrame
{
  public GridButtons1Frame()
  {
    setTitle("GridButtons");
    setSize(300, 200);
    setDefaultCloseOperation(EXIT_ON_CLOSE);
    Container contentPane = getContentPane();
    contentPane.add( new GridButtons1Panel() );
  }
}

public class GridButtons1
{
  public static void main(String[] args)
  {
    GridButtons1Frame frame = new GridButtons1Frame();
    frame.setVisible(true);
  }
}
which produces:

Note in particular that every cell in a GridLayout panel is the same size as every other cell.
Insets
Every component has a set of insets. Insets specify the widths of the component’s margins. Insets include:
- top inset
- left inset
- bottom inset
- right inset
For example, a frame’s insets include a top inset that compensates for the frame’s titlebar, and insets all around that compensate for the border (which we can use to resize the frame).
A panel contained within a frame has its own insets. Indeed, any component has its own insets. Usually, however, you only have to worry about insets for containers — unless you’re designing a new GUI component.
Layout managers are supposed to respect a container’s insets and never lay out a component in the inset margins. The layout managers supplied with the JDK all respect this. If you write a layout manager, you should write it to respect insets, too.
Note: It seems that the use of insets is now deprecated, in favor of borders. We’ll discuss borders, which are much richer and provide much greater flexibility, shortly.
Here’s an example that shows how to set insets for a container:
package swingExamples;

import java.awt.BorderLayout;
import java.awt.Color;
import java.awt.Container;
import java.awt.Insets;

import javax.swing.JButton;
import javax.swing.JFrame;
import javax.swing.JPanel;

class BorderButtonsInsetsPanel extends JPanel
{
  public BorderButtonsInsetsPanel()
  {
    setBackground(Color.GREEN);
    setLayout(new BorderLayout());
    add(m_north, BorderLayout.NORTH);
    add(m_south, BorderLayout.SOUTH);
    add(m_east, BorderLayout.EAST);
    add(m_west, BorderLayout.WEST);
    add(m_center, BorderLayout.CENTER);
  }

  // Override this method to specify the panel's
  // insets (top, left, bottom, right).
  public Insets getInsets()
  {
    return new Insets(5, 10, 15, 20);
  }

  ////////////// Data //////////////////
  private JButton m_north = new JButton("North");
  private JButton m_south = new JButton("South");
  private JButton m_east = new JButton("East");
  private JButton m_west = new JButton("West");
  private JButton m_center = new JButton("Center");
}

class BorderButtonsInsetsFrame extends JFrame
{
  public BorderButtonsInsetsFrame()
  {
    setTitle("BorderButtonsInsets");
    setSize(300, 200);
    setDefaultCloseOperation(EXIT_ON_CLOSE);
    Container contentPane = getContentPane();
    contentPane.add( new BorderButtonsInsetsPanel() );
  }
}

public class BorderButtonsInsets
{
  public static void main(String[] args)
  {
    BorderButtonsInsetsFrame frame =
                  new BorderButtonsInsetsFrame();
    frame.setVisible(true);
  }
}
which produces the following interesting effect:
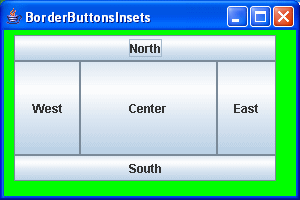
Note that the inset margins do not have to be the same all the way around. I’ve emphasized this in the above example, which makes it look a little strange. However, this can be used to advantage in some situations to improve the look of a GUI application.
Nested Layouts
By themselves, FlowLayout and BorderLayout provide very simple layout support. Real applications require more sophisticated support.
For example, suppose you wish to have a frame with several buttons at the bottom:
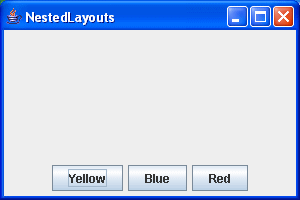
How can we accomplish this?
First attempt
You might think that you could use a BorderLayout, and simply add the three buttons all to the South. So your code might look like:
package swingExamples;

import java.awt.BorderLayout;
import java.awt.Container;

import javax.swing.JButton;
import javax.swing.JFrame;
import javax.swing.JPanel;

class NestedLayouts1Panel extends JPanel
{
  public NestedLayouts1Panel()
  {
    setLayout(new BorderLayout());
    add(m_yellow, BorderLayout.SOUTH);
    add(m_blue, BorderLayout.SOUTH);
    add(m_red, BorderLayout.SOUTH);
  }

  ////////////// Data //////////////////
  private JButton m_yellow = new JButton("Yellow");
  private JButton m_blue = new JButton("Blue");
  private JButton m_red = new JButton("Red");
}

class NestedLayouts1Frame extends JFrame
{
  public NestedLayouts1Frame()
  {
    setTitle("NestedLayouts");
    setSize(300, 200);
    setDefaultCloseOperation(EXIT_ON_CLOSE);
    Container contentPane = getContentPane();
    contentPane.add( new NestedLayouts1Panel() );
  }
}

public class NestedLayouts1
{
  public static void main(String[] args)
  {
    NestedLayouts1Frame frame = new NestedLayouts1Frame();
    frame.setVisible(true);
  }
}
but the results look like this:
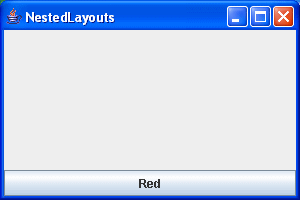
Notice that only the last component to be added to the South is the one that actually resides there.
That clearly doesn’t work!
Second Attempt
So what to do?
Here’s a better approach: You can create a separate panel, with a FlowLayout (the default layout manager for a JPanel), and add it to the south of the main panel, which uses a BorderLayout:
package swingExamples;

import java.awt.BorderLayout;
import java.awt.Color;
import java.awt.Container;

import javax.swing.JButton;
import javax.swing.JFrame;
import javax.swing.JPanel;

class NestedLayouts2Panel extends JPanel
{
  public NestedLayouts2Panel()
  {
    setLayout(new BorderLayout());
    add(new ButtonsPanel(), BorderLayout.SOUTH);
  }
}

class ButtonsPanel extends JPanel
{
  public ButtonsPanel()
  {
    setBackground(Color.pink);
    add(m_yellow);
    add(m_blue);
    add(m_red);
  }

  ////////////// Data //////////////////
  private JButton m_yellow = new JButton("Yellow");
  private JButton m_blue = new JButton("Blue");
  private JButton m_red = new JButton("Red");
}

class NestedLayouts2Frame extends JFrame
{
  public NestedLayouts2Frame()
  {
    setTitle("NestedLayouts");
    setSize(300, 200);
    setDefaultCloseOperation(EXIT_ON_CLOSE);
    Container contentPane = getContentPane();
    contentPane.add( new NestedLayouts2Panel() );
  }
}

public class NestedLayouts2
{
  public static void main(String[] args)
  {
    NestedLayouts2Frame frame = new NestedLayouts2Frame();
    frame.setVisible(true);
  }
}
which produces:
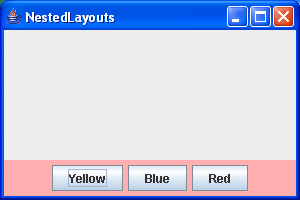
I colored the additional panel pink, to indicate its presence. If I hadn’t, you would have no visual indication that it was there.
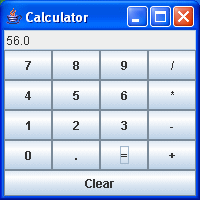
This approach of nesting layout managers of the appropriate types is very useful, and as a result is used heavily in Java GUIs. Nested layouts can be used to construct some surprisingly complex layouts.
A Calculator
Here’s an example of a simple calculator, laid out using nested panels with BorderLayout and GridLayout managers:
package swingExamples;

import java.awt.BorderLayout;
import java.awt.Container;
import java.awt.GridLayout;

import java.awt.event.ActionEvent;
import java.awt.event.ActionListener;

import javax.swing.JButton;
import javax.swing.JFrame;
import javax.swing.JPanel;
import javax.swing.JTextField;

class CalculatorPanel extends JPanel
{
  public CalculatorPanel()
  {
    setLayout(new BorderLayout());
    m_display.setEditable(false);
    add(m_display, BorderLayout.NORTH);
    add(m_buttonsPanel, BorderLayout.CENTER);
    add(m_clearButton, BorderLayout.SOUTH);
    m_clearButton.addActionListener( new ActionListener()
      {
        public void actionPerformed(ActionEvent evt)
        {
          m_buttonsPanel.clear();
        }
      }
    );
  }

  ////// Private data //////
  private JTextField m_display = new JTextField("0");
  private ButtonsPanel m_buttonsPanel = new ButtonsPanel();
  private JButton m_clearButton = new JButton("Clear");

  ////// Inner classes /////
  class ButtonsPanel extends JPanel
      implements ActionListener
  {
    public ButtonsPanel()
    {
      setLayout(new GridLayout(4, 4));
      String buttonLabels = "789/456*123-0.=+";
      for (int i = 0; i < buttonLabels.length(); i++)
      {
        addButton(buttonLabels.substring(i, i + 1));
      }
    }

    public void clear()
    {
      m_arg = 0.0;
      m_op = '=';
      m_start = true;
      m_display.setText("");
    }

    private void addButton(String label)
    {
      JButton button = new JButton(label);
      add(button);
      button.addActionListener(this);
    }

    // ActionListener required methods
    public void actionPerformed(ActionEvent evt)
    {
      String command = evt.getActionCommand();
      char commandChar = command.charAt(0);
      if ('0' <= commandChar &&
          commandChar <= '9' || commandChar == '.')
      {
        if (m_start)
        {
          m_display.setText(command);
        }
        else
        {
          m_display.setText(m_display.getText() +
                                commandChar);
        }
        m_start = false;
      }
      else
      {
        if (m_start)
        {
          if (commandChar == '-' || commandChar == '+')
          {
            m_display.setText(command);
            m_start = false;
          }
          else
          {
            m_op = commandChar;
          }
        }
        else
        {
          double x = Double.parseDouble(
                              m_display.getText());
          calculate(x);
          m_op = commandChar;
          m_start = true;
        }
      }
    }

    private void calculate(double n)
    {
      switch (m_op)
      {
        case '+':
          m_arg += n;
          break;
        case '-':
          m_arg -= n;
          break;
        case '*':
          m_arg *= n;
          break;
        case '/':
          m_arg /= n;
          break;
        case '=':
          m_arg = n;
      }
      m_display.setText("" + m_arg);
    }

    ////////////// Private Data //////////////////
    private boolean m_start = true;
    private double m_arg = 0.0;
    private char m_op = '=';
  }
}

class CalculatorFrame extends JFrame
{
  public CalculatorFrame()
  {
    setTitle("Calculator");
    setSize(200, 200);
    setDefaultCloseOperation(EXIT_ON_CLOSE);
    Container contentPane = getContentPane();
    contentPane.add( new CalculatorPanel() );
  }
}

public class Calculator
{
  public static void main(String[] args)
  {
    CalculatorFrame frame = new CalculatorFrame();
    frame.setVisible(true);
  }
}
which produces: